
Ubuntu - Basic Hardening


This article walks through practical hardening of an Ubuntu desktop or small server. The target audience is power users, independent consultants, and developers who manage their own machines. It is not aimed at enterprise sysadmins. That discipline is well beyond the scope of what is covered here.
All commands are written for Ubuntu 24.04 LTS. Notes for Ubuntu 26.04 appear where anything differs. If you want to test these steps safely first, run them in a VM. The following article shows how to set one up quickly with Quickemu: Running Windows 11 VMs in Minutes with Quickemu
What We Are Doing. And Why
Hardening is about reducing the number of ways an attacker can get in or move around, while keeping the system usable. The steps below are layered:
- Keep the system patched automatically
- Confirm AppArmor is active (it already is, by default)
- Set up a firewall
- Harden SSH for remote machines
- Remove packages and services you are not using
- Apply basic kernel-level protections
- Run an automated hardening role for the rest
At the end, we measure the result with Lynis.
1. Automatic Security Updates
Keeping the system patched is the single highest-return security action you can take. Unattended-upgrades applies critical patches quietly in the background, closing the most common vulnerabilities before they can be exploited.
Step 1 . Install the required packages
sudo apt update
sudo apt install unattended-upgrades needrestart -y
Step 2. Enable unattended-upgrades
sudo dpkg-reconfigure --priority=low unattended-upgrades
Answer Yes when prompted.
Step 3. Configure the allowed update sources
sudo nano /etc/apt/apt.conf.d/50unattended-upgrades
The Allowed-Origins block should look like this (this is the default):
Unattended-Upgrade::Allowed-Origins {
    "${distro_id}:${distro_codename}";
    "${distro_id}:${distro_codename}-security";
    "${distro_id}ESMApps:${distro_codename}-apps-security";
    "${distro_id}ESM:${distro_codename}-infra-security";
};
Note: The ESM lines only deliver extra updates if you have an active Ubuntu Pro subscription. Without it, they have no effect, but leaving them in is harmless.
Add these practical settings below the origins block:
Unattended-Upgrade::Remove-New-Unused-Dependencies "true";
Unattended-Upgrade::Automatic-Reboot "false";
Unattended-Upgrade::Automatic-Reboot-WithUsers "false";
Set Automatic-Reboot to "true" only if you want the machine to reboot overnight after kernel updates. For most desktop users, "false" is the right choice.
Step 4. (Optional) Configure needrestart
needrestart detects when running services are using outdated libraries after an update and prompts you to restart them. On a home system you can tell it to restart services automatically:
sudo nano /etc/needrestart/needrestart.conf
Find and set:
$nrconf{restart} = 'a';
Caution:'a'(automatic) is fine for home systems. On a machine running real services: databases, clustering, Java middleware, long-lived sessions, use'i'(interactive) instead, or you risk disrupting things unexpectedly.
Step 5.Verify
sudo unattended-upgrades --dry-run --verbose
On a fully updated system you will see:
No packages found that can be upgraded unattended and no pending auto-removals
2. Mandatory Access Control: AppArmor
AppArmor confines applications so that even a compromised process cannot access files, ports, or capabilities outside its defined profile. Ubuntu ships with AppArmor enabled and active by default on both 24.04 and 26.04. Your job here is simply to confirm it is running.
Check current status
sudo aa-status
A healthy system typically shows:
- The AppArmor module is loaded
- 100–120 profiles loaded (the exact number varies with installed snaps and packages)
- 24–41 profiles in enforce mode, meaning they actively block violations
Key services such as sshd and all snap applications are already confined.
Quick health check
sudo aa-enabled
Should return Yes.
Monthly verification (optional habit)
sudo aa-status --pretty
This prints a tree-style summary of which profiles are in enforce mode (blocking) versus complain mode (logging only). For most home setups, you never need to change anything. Just confirm AppArmor is running and leave it alone.
3. Firewall - ufw
ufw (Uncomplicated Firewall) is the right tool here. It sits on top of nftables, requires almost no ongoing maintenance, and is already available on Ubuntu.
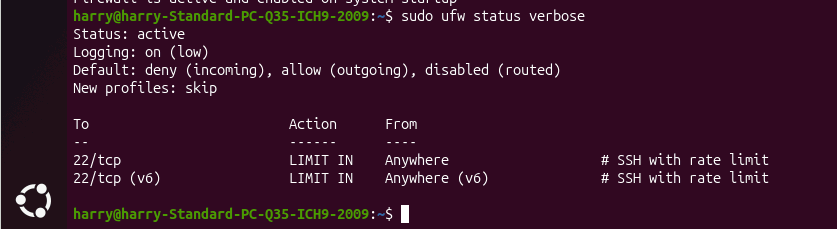
Why these defaults matter: Denying all incoming traffic and allowing all outgoing means your machine can reach the internet freely, but nothing on the internet can initiate a connection to your machine unless you explicitly allow it.
Set up the firewall
# Install ufw (safe to run even if already installed)
sudo apt update
sudo apt install ufw -y

# Sensible defaults
sudo ufw default deny incoming
sudo ufw default allow outgoing

# Allow SSH with rate limiting (max 6 connection attempts per 30 seconds per IP)
sudo ufw limit in ssh comment 'SSH with rate limit'

# Enable
sudo ufw enable

# Verify
sudo ufw status verbose
Common additional rules
# Allow mDNS for local network discovery (Avahi, AirPlay, etc.)
sudo ufw allow in mdns comment 'mDNS discovery'

# Allow a local web server only from your own network
# sudo ufw allow from 192.168.1.0/24 to any port 8443 proto tcp
After adding any rule:
sudo ufw reload
Ongoing checks
sudo ufw status numbered
sudo grep UFW /var/log/ufw.log | tail -20
Important: Uselimitinstead of plainallowfor SSH and other low-volume admin protocols that face the internet. Do not uselimitfor web servers, APIs, mail servers, or reverse proxies. Rate limiting those will block legitimate traffic.
Example of a blocked connection in ufw.log:
May 10 06:49:20 ubuntu-server kernel: [UFW BLOCK] IN=eth0 SRC=180.210.206.32
DST=203.0.113.45 PROTO=TCP DPT=23 SYN
Port 23 is Telnet. Something is probing for it. The firewall blocked it. This is normal background noise on any internet-facing machine.
4. SSH Hardening (Remote Machines Only)
Skip this section if you only use the machine locally.
Step 1. Create a dedicated sudo user
If your remote machine currently only has a root account, create a regular user first. Never run day-to-day work as root.
# Create user with home directory and bash shell
sudo useradd -m -s /bin/bash -G sudo <username>

# Set a password (history suppressed to avoid plaintext in shell history)
set +o history
echo "<username>:<password>" | sudo chpasswd
set -o history

# Confirm sudo membership
id <username>
Step 2. Generate an SSH key pair
Run this on your client machine, not the server:
ssh-keygen -t ed25519 -C "your-email@example.com"
Ed25519 is the current recommended key type. It is faster and more secure than RSA. The email is just a human-readable comment in the public key to identify whose key it is.
Step 3. Copy the public key to the server
ssh-copy-id <username>@<server-ip-or-hostname>
Test that key-based login works before proceeding. Do not lock out password authentication until you have confirmed this works.
Step 4. Install CrowdSec
CrowdSec watches logs for suspicious patterns, blocks bad IPs for extended periods, and draws on a shared community blocklist. It is an effective complement to ufw's rate limiting.
You need both the agent (which analyses logs) and the firewall bouncer (which enforces the blocks).
# Add the official CrowdSec repository
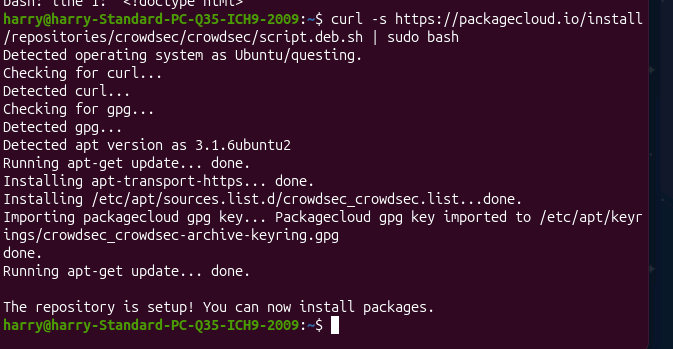
curl -s https://packagecloud.io/install/repositories/crowdsec/crowdsec/script.deb.sh | sudo bash
# Install agent and bouncer
sudo apt update
sudo apt install crowdsec crowdsec-firewall-bouncer-nftables -y

# Start the agent
sudo systemctl enable --now crowdsec
sudo systemctl status crowdsec   # Confirm it is running before continuing

# Generate an API key for the bouncer
sudo cscli bouncers add crowdsec-firewall-bouncer
Copy the API key that is printed. You will need it in the next step. It is only shown once.
# Add the API key to the bouncer config
sudo nano /etc/crowdsec/bouncers/crowdsec-firewall-bouncer.yaml
Find the api_key: line and paste your key:
api_key: "your-key-here"
# Start and enable the bouncer
sudo systemctl enable --now crowdsec-firewall-bouncer
sudo systemctl restart crowdsec-firewall-bouncer
sudo systemctl status crowdsec-firewall-bouncer
Verification
# List registered bouncers
sudo cscli bouncers list

# Validate the bouncer configuration
sudo /usr/bin/crowdsec-firewall-bouncer -c /etc/crowdsec/bouncers/crowdsec-firewall-bouncer.yaml -t
# Should print: config is valid

Troubleshooting: Bleeding-edge distros
If sudo apt update fails after adding the CrowdSec repo with a message about a missing Release file, the repository does not yet have a package for your Ubuntu version. Point it to the previous stable release instead:
# Only run this if apt update fails after adding the CrowdSec repo
sudo sed -i 's/questing/noble/g' /etc/apt/sources.list.d/crowdsec_crowdsec.list
sudo apt update
Note:
- questing = Ubuntu 25.10 (the current distribution in this example)
- noble = Ubuntu 24.04 LTS (the closest fully supported CrowdSec release in this example)
Make sure the codenames match your actual system.
Step 5. Lock down the SSH daemon
sudo mkdir -p /etc/ssh/sshd_config.d
sudo nano /etc/ssh/sshd_config.d/hardening.conf
Add:
PermitRootLogin no
PasswordAuthentication no
PubkeyAuthentication yes
Validate and restart:
sudo sshd -t          # Must show no errors before restarting
sudo systemctl restart ssh
Important: Do not close your current SSH session until you have confirmed that key-based login works in a new session. If something is misconfigured and you are locked out, you will need console access to fix it.
5. Remove Unnecessary Services and Packages
Every running service and installed package is a potential entry point. Removing what you do not use is one of the quickest ways to shrink your attack surface.
Note: If you plan to run the Ansible hardening playbook in section 7, it handles steps 2 and 3 automatically. You can skip ahead.
Step 1. See what is listening on the network
sudo ss -tuln
Look for anything you do not recognise. Port 23 (Telnet), port 111 (RPC), and port 512-514 (rsh) should not be present on a modern system.
Step 2. Remove legacy insecure packages
These packages are insecure by design and have no place on a 2026 system:
sudo apt purge -y \
  telnet \
  telnetd \
  rsh-client \
  rsh-server \
  rsh-redone-server \
  xinetd \
  inetutils-telnetd \
  nis \
  yp-tools \
  tftpd-hpa \
  atftpd

sudo apt autoremove -y
Most of these will not be installed. The command is safe to run regardless.
Step 3. Mask services you do not need
Masking a service prevents it from being started, even if something else tries to enable it. This is stronger than simply disabling.
# Cellular modem manager: only needed if you use a mobile broadband dongle
sudo systemctl mask --now ModemManager

# mDNS/Avahi: only needed for Apple-style device discovery on local network
# sudo systemctl mask --now avahi-daemon

# Bluetooth: safe to mask on machines without bluetooth hardware
# sudo systemctl mask --now bluetooth
Uncomment the lines for any services you do not use. On servers, you likely want to mask all three.
Step 4. Verify
sudo ss -tuln
You should see fewer open ports than before.
6. Basic Kernel Hardening with sysctl
The Linux kernel exposes many security-related settings through sysctl. The file below applies conservative, well-understood protections with no measurable performance impact on a home or small-server system.
Note: If you are running the Ansible playbook in section 7, skip this: The playbook covers it.
Step 1. Create the configuration file
sudo nano /etc/sysctl.d/99-hardening.conf
Paste:
# Basic kernel hardening: Ubuntu home and small-server systems (2026)

# SYN cookies: protects against SYN flood attacks, where an attacker
# overwhelms the TCP connection queue by sending many half-open connections.
net.ipv4.tcp_syncookies = 1

# Reverse path filtering: causes the kernel to drop packets that arrive
# on an interface they could not have originated from. This stops most
# IP spoofing attacks where the source address is forged.
net.ipv4.conf.all.rp_filter = 1
net.ipv4.conf.default.rp_filter = 1

# Disable source routing: source-routed packets let the sender specify
# the network path. Legitimate traffic never needs this; attackers use it
# to bypass routing controls.
net.ipv4.conf.all.accept_source_route = 0
net.ipv4.conf.default.accept_source_route = 0

# Log martian packets: writes packets with impossible or suspicious source
# addresses to syslog. Useful for awareness and troubleshooting.
net.ipv4.conf.all.log_martians = 1
net.ipv4.conf.default.log_martians = 1

# Increase the SYN backlog queue: allows the kernel to handle more
# half-open connections before dropping them during a flood.
net.ipv4.tcp_max_syn_backlog = 2048
Step 2. Apply immediately
sudo sysctl --load=/etc/sysctl.d/99-hardening.conf
Step 3. Verify
sysctl net.ipv4.tcp_syncookies
sysctl net.ipv4.conf.all.rp_filter
Both should return 1.
Settings in /etc/sysctl.d/ are loaded automatically on every boot. To revert any setting, comment out the relevant line and run sudo sysctl --system.
What these settings actually do (in plain English)
- SYN cookies protect your machine when someone tries to flood it with connection requests.
- Reverse path filtering (rp_filter) stops most IP spoofing attacks.
- log_martians writes suspicious packets to the log so you can see if anything odd is happening.
These changes are conservative enough that they will not break normal home networking, browsing, or file sharing, yet they close several common low-effort attack vectors at the kernel level.
You can always remove or comment out lines in /etc/sysctl.d/99-hardening.conf and run sudo sysctl --system again if you ever need to revert anything.
7. Automated Hardening with Ansible and devsec.hardening
The manual steps above cover the most important surface areas. The devsec.hardening Ansible collection takes care of the rest. It applies a large set of well-maintained, tested hardening rules drawn from CIS and other security benchmarks, without the aggression of a full CIS lockdown script.
What devsec.hardening.os_hardening does (among other things):
- Removes the same legacy packages covered in section 5
- Applies comprehensive sysctl hardening (a superset of section 6)
- Sets secure file and directory permissions
- Hardens user account policies (password aging, login defaults)
- Restricts compiler access and core dumps
Read the full list of what the role changes before running it:
 dev-sec
Step 1. Install Ansible and the collection
sudo apt install ansible -y
sudo ansible-galaxy collection install devsec.hardening
Step 2. Create the playbook
mkdir -p ~/tools/ansible-playbooks
nano ~/tools/ansible-playbooks/harden.yml
Paste:
- name: Apply devsec os_hardening
  hosts: localhost
  become: true
  become_method: sudo
  collections:
    - devsec.hardening
  roles:
    - devsec.hardening.os_hardening
Step 3. Run it
sudo ansible-playbook --connection=local ~/tools/ansible-playbooks/harden.yml
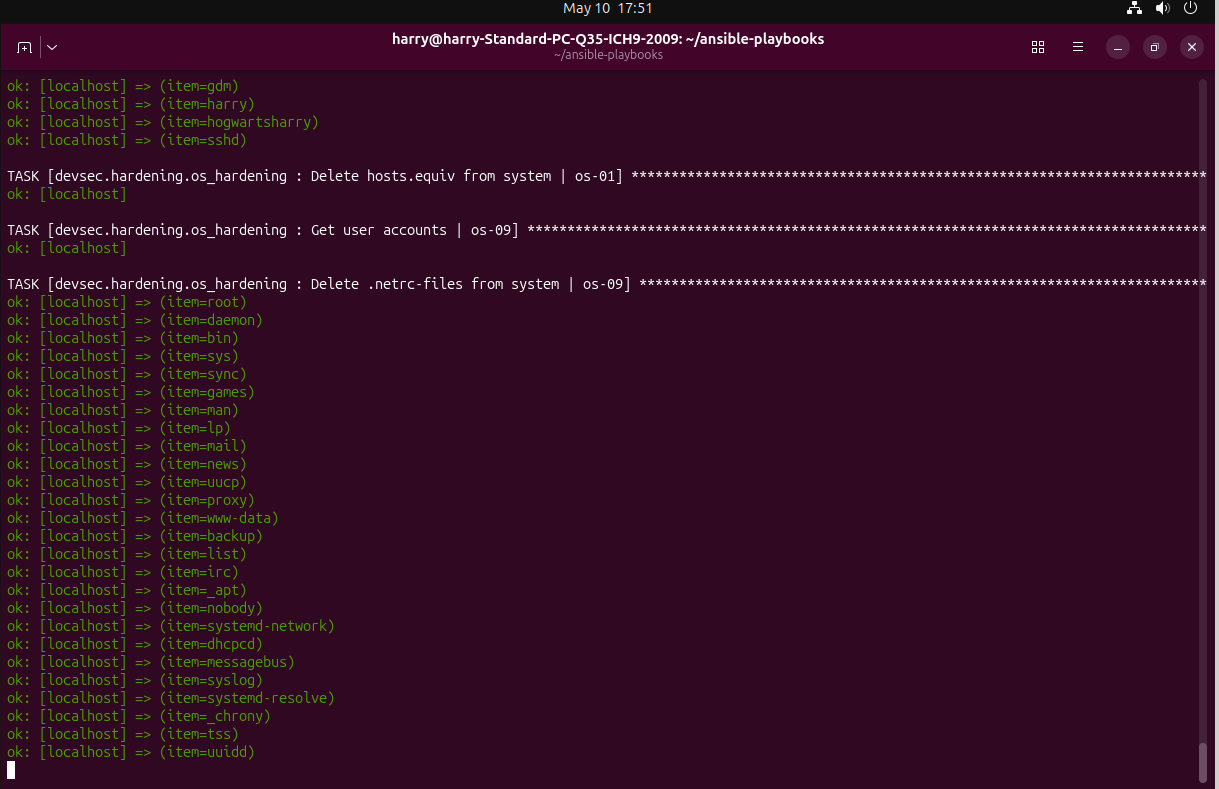
The playbook runs locally on the current machine. If you manage multiple Linux hosts, you can later point this at a full inventory and run it across your entire server fleet.
Results: Lynis Audit Score
Lynis (also called CISOfy Linux) audits the system against a checklist of security controls and produces a score from 0 to 100. As reference points: a well-hardened desktop typically scores around 80, and a well-hardened server around 92.
The test machine was Ubuntu 25.10, which already includes some hardening from Canonical out of the box.
| State | Score |
|---|---|
| Out of the box (only apt updates applied) | 67 / 100 |
| After manual hardening (sections 1–6) | 68 / 100 |
| After manual + automated hardening (all sections) | 80 / 100 |
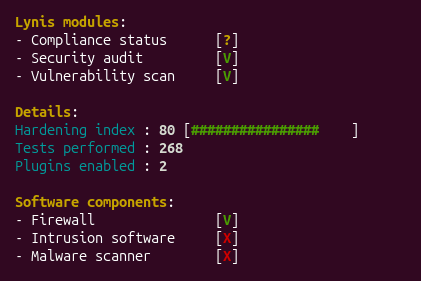
The small jump from 67 to 68 after the manual steps is expected: Most of what Lynis rewards is the kind of systematic hardening the Ansible role handles. The manual steps are still important: they are faster to apply, easier to understand, and give you direct control over the most impactful settings.
Going Further: Optional Next Steps
The steps above give a solid, practical baseline. If you want to go deeper:
- LUKS disk encryption: protects data if the machine is stolen. Ubuntu's installer can set this up during installation; it is harder to add afterwards.
- SSH MFA: consider PAM-based two-factor authentication if you use password-based SSH login on any machine.
- Ubuntu Pro / ESM: free for up to 5 machines. Extends security updates to 2029–2036 for 24.04 LTS. Worth enabling for any server you expect to keep running long-term.
- AIDE (file integrity monitoring): detects unexpected changes to system files. Catches certain post-compromise actions that other tools miss.
- Secure Boot and measured boot chains: Ubuntu has solid support for both since 22.04.
Canonical's Ubuntu Security Guide (usg) for servers, sudo usg fix cis_level1_server applies a comprehensive, auditable CIS baseline.
Warning: usg is compliance-focused, not usability-focused. It can break the desktop, disrupt containers, lock you out of SSH if you are not using key-based auth, and modify PAM in unexpected ways. Always test in a VM first and read the documentation.NOTE: The ansible-galaxy collection ansible-lockdown.ubuntu24_cis and friends can be viewed at https://github.com/ansible-lockdown. If you want to use them (or Canonical's usg script above) make sure to match the lockdown script with the precise version of Ubuntu (or other distro, or Windows) that you are on, and test in a VM first.